

The travis gem includes both a command line client and a Ruby library to interface with a Travis CI service using GitHub account. Both work with travis-ci.com or any custom Travis CI setup you might have. Check out the installation instructions to get it running in no time.
- Command Line Client
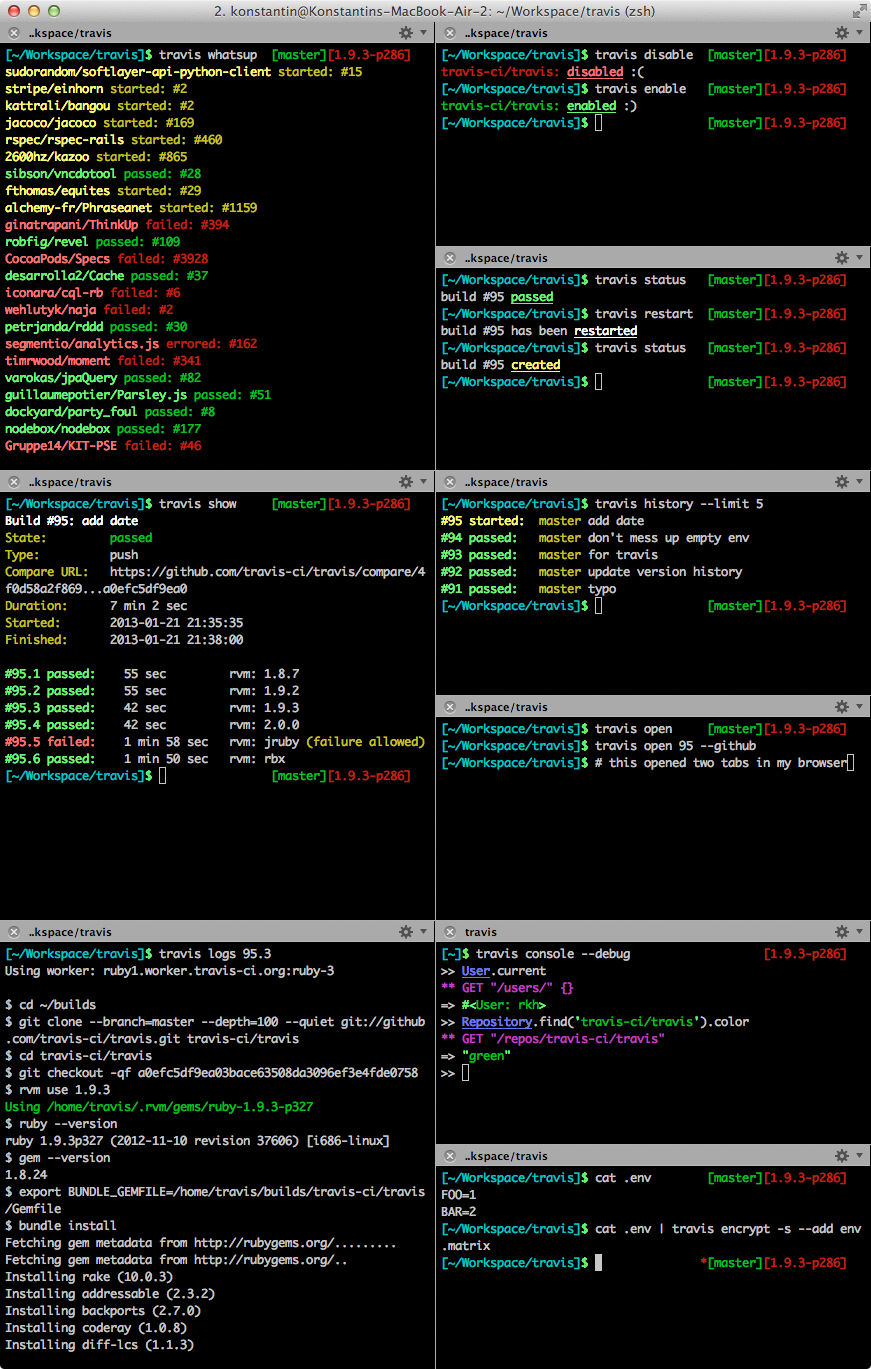
- Non-API Commands
- General API Commands
accounts- displays accounts and their subscription statusconsole- interactive shell; requirespryendpoint- displays or changes the API endpointlogin- authenticates against the API and stores the tokenmonitor- live monitor for what's going onraw- makes an (authenticated) API call and prints out the resultregenerate-token- regenerates the stored API tokenremove-token- deletes the stored API tokenreport- generates a report useful for filing issuesrepos- lists repositories the user has certain permissions onsync- triggers a new sync with GitHublint- display warnings for a .travis.ymltoken- outputs the secret API tokenwhatsup- lists most recent buildswhoami- outputs the current user
- Repository Commands
branches- displays the most recent build for each branchcache- lists or deletes repository cachescancel- cancels a job or builddisable- disables a projectenable- enables a projectencrypt- encrypts values for the .travis.ymlencrypt-file- encrypts a file and adds decryption steps to .travis.ymlenv- show or modify build environment variableshistory- displays a project's build historyinit- generates a .travis.yml and enables the projectlogs- streams test logsopen- opens a build or job in the browserpubkey- prints out a repository's public keyrequests- lists recent requestsrestart- restarts a build or jobsettings- access repository settingssetup- sets up an addon or deploy targetshow- displays a build or jobsshkey- checks, updates or deletes an SSH keystatus- checks status of the latest build
- Travis CI and Travis CI Enterprise
- Environment Variables
- Desktop Notifications
- Plugins
- Ruby Library
- Installation
- Version History
There are three types of commands: Non-API Commands, General API Commands and Repository Commands. All commands take the form of travis COMMAND [ARGUMENTS] [OPTIONS]. You can get a list of commands by running help.
Every Travis command takes three global options:
-h, --help                       Display help
-i, --[no-]interactive           be interactive and colorful
-E, --[no-]explode               don't rescue exceptions
The --help option is equivalent to running travis help COMMAND.
The --interactive options determines whether to include additional information and colors in the output or not (except on Windows, we never display colors on Windows, sorry). If you don't set this option explicitly, you will run in interactive mode if you invoke the command directly in a shell and in non-interactive mode if you pipe it somewhere.
You probably want to use --explode if you are working on a patch for the Travis client, as it will give you the Ruby exception instead of a nice error message.
The help command will inform you about the arguments and options that the commands take, for instance:
$ travis help help
Usage: travis help [command] [options]
    -h, --help                       Display help
    -i, --[no-]interactive           be interactive and colorful
    -E, --[no-]explode               don't rescue exceptions
Running help without a command name will give you a list of all available commands.
As you might have guessed, this command prints out the client's version.
API commands inherit all options from Non-API Commands.
Additionally, every API command understands the following options:
-e, --api-endpoint URL           Travis API server to talk to
    --com                        short-cut for --api-endpoint 'https://api.travis-ci.com/'
    --pro                        short-cut for --api-endpoint 'https://api.travis-ci.com/'
    --org                        short-cut for --api-endpoint 'https://api.travis-ci.org/'
-t, --token [ACCESS_TOKEN]       access token to use
    --debug                      show API requests
    --adapter ADAPTER            Faraday adapter to use for HTTP requests
You can supply an access token via --token if you want to make an authenticated call. If you don't have an access token stored for the API endpoint, it will remember it for subsequent requests. Keep in mind, this is not the "Travis token" used when setting up GitHub hooks (due to security). You probably don't have an access token handy right now. Don't worry, usually you won't use this option but instead just do a travis login.
The --debug option will print HTTP requests to STDERR. Like --explode, this is really helpful when contributing to this project.
There are many libraries out there to do HTTP requests in Ruby. You can switch amongst common ones with --adapter:
$ travis show --adapter net-http
...
$ gem install excon
...
$ travis show --adapter excon
...The accounts command can be used to list all the accounts you can set up repositories for.
$ travis accounts
rkh (Konstantin Haase): subscribed, 160 repositories
sinatra (Sinatra): subscribed, 9 repositories
rack (Official Rack repositories): subscribed, 3 repositories
travis-ci (Travis CI): subscribed, 57 repositories
...Provides an interactive shell via pry.
Running travis console gives you an interactive Ruby session with all the entities imported into global namespace.
This has advantages over irb -r travis, such as:
- It will take care of authentication, setting the correct endpoint, etc.
- It also allows you to pass in
--debugif you are curious as to what's actually going on.
$ travis console
>> User.current
=> #<User: rkh>
>> Repository.find('sinatra/sinatra')
=> #<Repository: sinatra/sinatra>
>> _.last_build
=> #<Travis::Client::Build: sinatra/sinatra#360>
Interactive shell; requires `pry`.
Usage: travis console [OPTIONS]
-h, --help Display help
-i, --[no-]interactive be interactive and colorful
-E, --[no-]explode don't rescue exceptions
--skip-version-check don't check if travis client is up to date
--skip-completion-check don't check if auto-completion is set up
-e, --api-endpoint URL Travis API server to talk to
-I, --[no-]insecure do not verify SSL certificate of API endpoint
--pro short-cut for --api-endpoint 'https://api.travis-ci.com/'
--com short-cut for --api-endpoint 'https://api.travis-ci.com/'
--org short-cut for --api-endpoint 'https://api.travis-ci.org/'
--staging talks to staging system
-t, --token [ACCESS_TOKEN] access token to use
--debug show API requests
--debug-http show HTTP(S) exchange
-X, --enterprise [NAME] use enterprise setup (optionally takes name for multiple setups)
--adapter ADAPTER Faraday adapter to use for HTTP requests
-x, --eval LINE run line of ruby
Prints out the API endpoint you're talking to.
$ travis endpoint
API endpoint: https://api.travis-ci.org/
Handy for using it when working with shell scripts:
$ curl "$(travis endpoint)/docs" > docs.htmlIt can also be used to set the default API endpoint used for General API Commands:
$ travis endpoint --com --set-default
API endpoint: https://api.travis-ci.com/ (stored as default)
You can use --drop-default to remove the setting again:
$ travis endpoint --drop-default
default API endpoint dropped (was https://api.travis-ci.com/)The login command will, well, log you in. That way, all subsequent commands that run against the same endpoint will be authenticated.
$ travis login --pro --github-token ghp_********
Successfully logged in as rkh!
You need to use a GitHub token and supply it via --github-token. Travis CI will not store the token, though - after all, it already should have a valid token for you in the database.
NOTE: When creating a GitHub token, see GitHub Permissions used by travis-ci.com or GitHub Permissions used by travis-ci.org. The token permissions are dependent on use of travis-ci.com or travis-ci.org and not if they are public or private repositories.
A third option is for the really lazy: --auto. In this mode the client will try to find a GitHub token for you and just use that. This will only work if you have a global GitHub token stored in your .netrc. If you haven't heard of this, it's worth looking into in general. Again: Travis CI will not store that token.
This command makes Travis CI forget your access token.
$ travis logout --com
Successfully logged out!Usage: travis monitor [options]
-h, --help Display help
-i, --[no-]interactive be interactive and colorful
-E, --[no-]explode don't rescue exceptions
--skip-version-check don't check if travis client is up to date
-e, --api-endpoint URL Travis API server to talk to
--com short-cut for --api-endpoint 'https://api.travis-ci.com/'
--org short-cut for --api-endpoint 'https://api.travis-ci.org/'
-t, --token [ACCESS_TOKEN] access token to use
--debug show API requests
-X, --enterprise [NAME] use enterprise setup (optionally takes name for multiple setups)
-m, --my-repos Only monitor my own repositories
-r, --repo SLUG monitor given repository (can be used more than once)
-R, --store-repo SLUG like --repo, but remembers value for current directory
-n, --[no-]notify [TYPE] send out desktop notifications (optional type: osx, growl, libnotify)
-b, --builds only monitor builds, not jobs
-p, --push monitor push events
-P, --pull monitor pull request events
With monitor you can watch a live stream of what's going on:
$ travis monitor
Monitoring travis-ci.org:
2013-08-05 01:22:40 questmaster/FATpRemote#45 started
2013-08-05 01:22:40 questmaster/FATpRemote#45.1 started
2013-08-05 01:22:41 grangier/python-goose#33.1 passed
2013-08-05 01:22:42 plataformatec/simple_form#666 passed
...
You can limit it to a single repository via --repo SLUG.
By default, you will receive events for both builds and jobs, you can limit it to builds only via --build (short -b):
$ travis monitor
Monitoring travis-ci.org:
2013-08-05 01:22:40 questmaster/FATpRemote#45 started
2013-08-05 01:22:42 plataformatec/simple_form#666 passed
...
Similarly, you can limit it to builds/jobs for pull requests via --pull and for normal pushes via --push.
The monitor command can also send out desktop notifications:
$ travis monitor --com -n
Monitoring travis-ci.com:
...
When monitoring specific repositories, notifications will be turned on by default. Disable with --no-notify.
This is really helpful both when working on this client and when exploring the Travis API. It will simply fire a request against the API endpoint, parse the output and pretty print it. Keep in mind that the client takes care of authentication for you:
$ travis raw /repos/travis-ci/travis.rb
{"repo"=>
  {"id"=>409371,
   "slug"=>"travis-ci/travis.rb",
   "description"=>"Travis CI Client (CLI and Ruby library)",
   "last_build_id"=>4251410,
   "last_build_number"=>"77",
   "last_build_state"=>"passed",
   "last_build_duration"=>351,
   "last_build_language"=>nil,
   "last_build_started_at"=>"2013-01-19T18:00:49Z",
   "last_build_finished_at"=>"2013-01-19T18:02:17Z"}}
Use --json if you'd rather prefer the output to be JSON.
This command is used to regenerate the stored API token. New token will be stored in the config.
$ travis regenerate-token
Successfully regenerated the token!This command is used to remove the access token from the config, log out the user and disable the token.
$ travis remove-token
Successfully removed the access token!When inspecting a bug or reporting an issue, it can be handy to include a report about the system and configuration used for running a command.
$ travis report --com
System
Ruby:                     Ruby 2.0.0-p195
Operating System:         Mac OS X 10.8.5
RubyGems:                 RubyGems 2.0.7

CLI
Version:                  1.5.8
Plugins:                  "travis-as-user", "travis-build", "travis-cli-pr"
Auto-Completion:          yes
Last Version Check:       2013-11-02 16:25:03 +0100

Session
API Endpoint:             https://api.travis-ci.com/
Logged In:                as "rkh"
Verify SSL:               yes
Enterprise:               no

Endpoints
pro:                      https://api.travis-ci.com/ (access token, current)
org:                      https://api.travis-ci.org/ (access token)

Last Exception
An error occurred running `travis whoami --com`:
    Travis::Client::Error: access denied
        from ...


For issues with the command line tool, please visit https://github.com/travis-ci/travis.rb/issues.
For Travis CI in general, go to https://github.com/travis-ci/travis-ci/issues or email