Transparent, extensible background processing for Ruby & PostgreSQL
Toro is a job queueing system (similar to Sidekiq or Resque) that runs on PostgreSQL and focuses on concurrency, visibility, extensibility, and durability:
- Toro can run many jobs simultaneously in a single process (a la Sidekiq; it uses Celluloid)
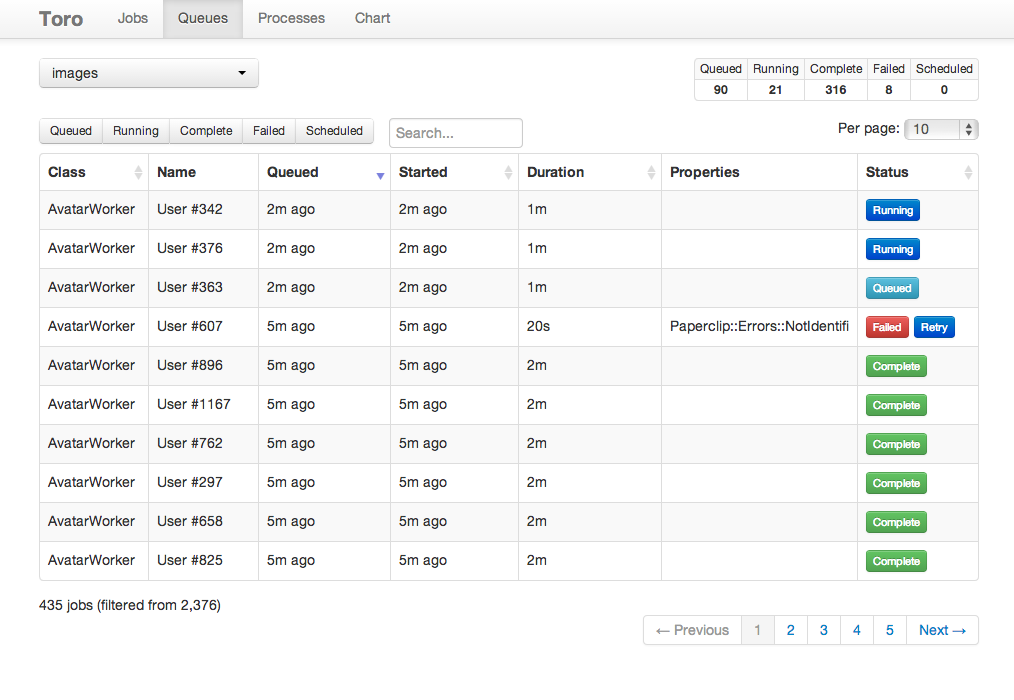
An extensive dashboard:
- Sort jobs by queue, worker, start time, queued time, duration, customizable name, status
- Filter jobs by queue, worker, customizable name, status
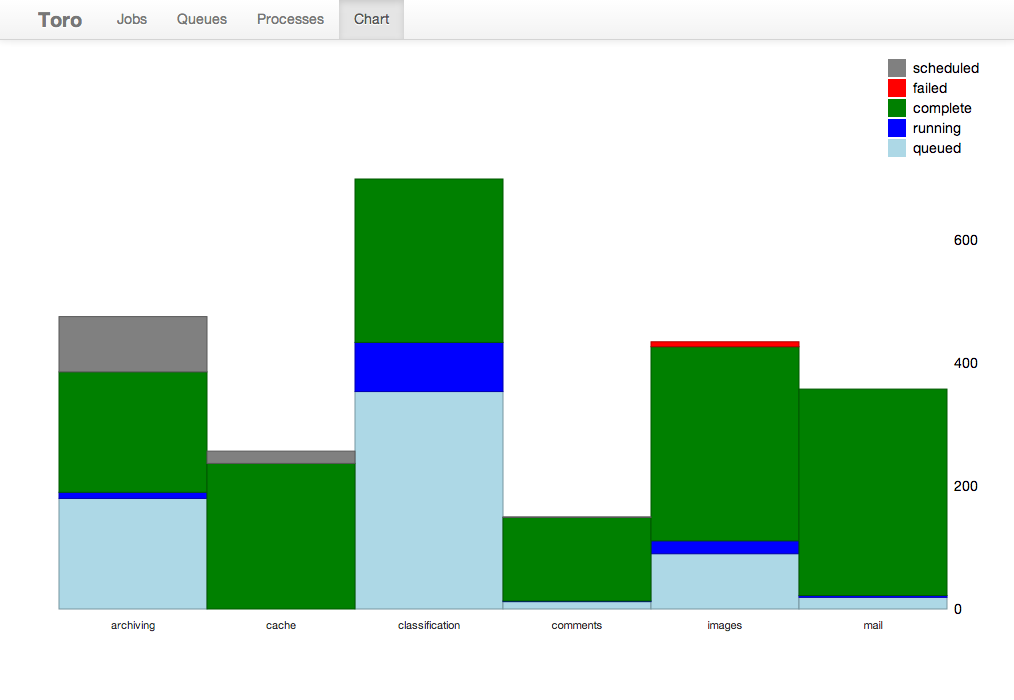
- Stacked histograms show the status distribution for each queue
- A process table shows which machines/processes are active and which jobs they're running
- Buttons for manually retrying failed jobs
- Job detail view with in-depth job information:
- Basics: worker class, arguments, start time, duration, process name
- Exception class, message, and backtrace of failed jobs
- A list of the exceptions and start times of retried jobs
- Customizable job properties
- Middleware support
- Customizable UI views
- Customizable job names
- Customizable job properties
- Store job-related metadata that's set during the job's execution
- Stored in an hstore
- Properties can be indexed and queried against
- Jobs can be associated with other ActiveRecord models using a property as the foreign key
- Toro runs on PostgreSQL
- Scheduled jobs
- Configurable retry of failed jobs
Toro has an extensive dashboard that provides in-depth information about jobs, queues, processes, and more:


Add Toro to your Gemfile:
gem 'toro'Mount the UI at a route in routes.rb:
mount Toro::Monitor::Engine => '/toro'And install and run the migration:
rails g toro:install
rake db:migrateCreate a worker:
# app/workers/my_worker.rb
class MyWorker
  include Toro::Worker

  def perform(user_id)
    puts "Processing user #{user_id}..."
  end
end
In your controller action, model, or elsewhere, queue a job:
MyWorker.perform_async(15)Start Toro in the root directory of your Rails app:
rake toroBy default, workers and processes use the default queue.
To set a worker's queue, use toro_options:
# app/workers/my_worker.rb
class MyWorker
  include Toro::Worker
  toro_options queue: 'users'

  def perform(user_id)
    puts "Processing user #{user_id}..."
  end
end
To set a process's queue, use -q:
rake toro -- -q usersOr specify multiple queues:
rake toro -- -q users -q commentsTo specify a process's concurrency (how many jobs it can run simultaneously), use -c:
rake toro -- -c 10To schedule a job for a specific time, use perform_in(interval, *args) or perform_at(timestamp, *args) instead of the standard perform_async(*args):
MyWorker.perform_in(2.hours, 'First arg', 'Second arg')
MyWorker.perform_at(2.hours.from_now, 'First arg', 'Second arg')Failing jobs aren't retried by default. If you'd like Toro to retry a worker's failed jobs, specify the retry interval in the worker:
# app/workers/my_worker.rb
class MyWorker
  include Toro::Worker
  toro_options retry_interval: 2.hours

  def perform(user_id)
    puts "Processing user #{user_id}..."
  end
end
The error classes and times of retried jobs are stored as job properties.
Toro::Job is an ActiveRecord model, which allows you to easily create complex queries against jobs that aren't easily performed in Redis-based job queueing systems. The model has the following columns:
- queue - Queue
- class_name - Worker class
- args - Arguments
- name - Name
- created_at - When the job was created
- scheduled_at - When the job was scheduled for (if it's a scheduled job)
- started_at - When the job was started
- finished_at - When the job finished (regardless of whether it succeeded or failed)
- status -
queued,running,complete,failed, orscheduled - started_by - Host and PID of the process running the job (e.g.
ip-10-55-10-151:1623) - properties - An hstore containing customizable job properties
To set a job's name, define a self.job_name method that takes the same arguments the perform method:
class MyWorker
  include Toro::Worker

  def perform(user_id)
  end

  def self.job_name(user_id)
    User.find(user_id).username
  end
end
A job name makes the job more recognizable in the UI. The UI also lets you search by name.
Job properties let you store custom data about your jobs and their results.
To set job properties, make the perform method return a hash with a :job_properties key:
class MyWorker
  include Toro::Worker

  def perform(user_id)
    comments = User.find(user_id).comments
    # Do some processing...
    {
      job_properties: {
        user_id: user_id,
        comments_count: comments.length
      }
    }
  end
end
The job properties will be shown in the job detail view in the UI.
Properties are stored using Nested Hstore, so you can store nested hashes, arrays, or any other types, allowing for NoSQL-like document storage:
class MyWorker
  include Toro::Worker

  def perform(user_id)
    user = User.find(user_id)
    comments = user.comments
    # Do some processing...
    {
      job_properties: {
        user: {
          id: user.id,
          is_blacklisted: user.is_blacklisted?,
          timeline: {
            is_private: user.timeline.is_private
          }
        },
        comment_ids: comments.map(&:id)
      }
    }
  end
endJob properties are stored in an hstore, so you can query them (e.g. for reporting):
big_jobs = Toro::Job.where("(properties->'comments_count')::int > ?", 100)You can create associations between jobs and other models using job properties:
class User < ActiveRecord::Base
  has_many :jobs, foreign_key: "toro_jobs.properties->'user_id'", class_name: 'Toro::Job'
end
You can then, for example, find the failed jobs for a user:
failed_jobs = User.find(1).jobs.where(status: 'failed')Toro's middleware support lets you run code "around" the processing of a job. Writing middleware is easy:
# lib/my_middleware.rb
class MyMiddleware
  def call(job, worker)
    begin
      puts "Starting to process Job ##{job.id}"
      yield
      puts "Finished running Job ##{job.id}"
    rescue Exception => exception
      puts "Exception raised for Job ##{job.id}: #{exception}"
      job.update_attribute(status: 'failed')
      raise exception
    end
  end
end
Then register your middleware as part of the chain:
# config/initializers/toro.rb
Toro.configure_server do |config|
  config.server_middleware do |chain|
    chain.add MyMiddleware
  end
end
Toro supports the same server middleware inferface that Sidekiq does (including arguments, middleware removal, etc). Please see the Sidekiq Middleware documentation for details.
A single histogram will be shown by default in the Chart view, but you can also split the queues into multiple histograms. (This is especially useful if you have a large number of queues and the single histogram has too many bars to be readable.) The keys of this hash are JS regex patterns for matching queues, and the values of the hash will be the titles of each histogram:
# config/initializers/toro.rb
Toro::Monitor.options[:charts] = {
  'ALL' => 'All',
  'OTHER' => 'Default Priority',
  '_high$' => 'High Priority',
  '_low$' => 'Low Priority'
}
ALL and OTHER are special keys: ALL will show all queues and OTHER will show all queues that aren't matched by the regex keys.
The UI uses polling to update its data. By default, the polling interval is 3000ms, but you can adjust this like so:
# config/initializers/toro.rb
Toro::Monitor.options[:poll_interval] = 5000When you click on a job, a modal showing its properties is displayed. You can add subviews to this modal by creating a view in your app and calling Toro::Monitor::CustomViews.add, passing it the subview's title, the subview's filepath, and a block. The subview is only rendered if the block evaluates to true for the given job.
If you need to add JavaScript for the subview, you can do so by adding an asset path to Toro::Monitor.options[:javascripts].
For example, the following code adds a subview that shows a "Retry" button for jobs with the specified statuses:
# config/initializers/toro.rb
view_path = Rails.root.join('app', 'views', 'toro', 'monitor', 'retry').to_s
Toro::Monitor::CustomViews.add('My View Title', view_path) do |job|
  %w{complete failed}.include?(job.status)
end
Toro::Monitor.options[:javascripts] << 'toro/monitor/retry'
/ app/views/toro/monitor/retry.slim
a class='btn btn-success' href='#' data-action='retry_job' data-job-id=job.id = 'Retry'
# app/assets/javascripts/toro/monitor/retry.js.coffee
$ ->
  $('body').on 'click', '.job-modal [data-action=retry_job]', (e) ->
    id = $(e.target).attr('data-job-id')
    $.get ToroMonitor.settings.api_url("jobs/retry/#{id}")
    alert 'Job has been retried'
falseYou'll likely want to restrict access to the UI in a production environment. To do this, you can use routing constraints:
Checks a User model instance that responds to admin?
constraint = lambda { |request| request.env["warden"].authenticate? and request.env['warden'].user.admin? }
constraints constraint do
  mount Toro::Monitor::Engine => '/toro'
end
Allow any authenticated User
constraint = lambda { |request| request.env['warden'].authenticate!({ scope: :user }) }
constraints constraint do
  mount Toro::Monitor::Engine => '/toro'
end
Short version
authenticate :user do
  mount Toro::Monitor::Engine => '/toro'
end# lib/admin_constraint.rb
class AdminConstraint
def matches?(request)
return false unless request.cookies['user_credentials'].present?
user = User.find_by_persistence_token(request.cookies['user_credentials'].split(':')[0])
user && user.admin?
end
end
# config/routes.rb
require "admin_constraint"
mount Toro::Monitor::Engine => '/toro', :constraints => AdminConstraint.newChecks a User model instance that responds to admin?
# lib/admin_constraint.rb
class AdminConstraint
  def matches?(request)
    return false unless request.session[:user_id]
    user = User.find request.session[:user_id]
    user && user.admin?
  end
end

# config/routes.rb
require "admin_constraint"
mount Toro::Monitor::Engine => '/toro', :constraints => AdminConstraint.newclass AuthConstraint
def self.admin?(request)
return false unless (cookie = request.cookies['auth'])
Rails.cache.fetch(cookie['user'], :expires_in => 1.minute) do
auth_data = JSON.parse(Base64.decode64(cookie['data']))
response = HTTParty.post(Auth.validate_url, :query => auth_data)
response.code == 200 && JSON.parse(response.body)['roles'].to_a.include?('Admin')
end
end
end
# config/routes.rb
constraints lambda {|request| AuthConstraint.admin?(request) } do
mount Toro::Monitor::Engine => '/admin/toro'
end(This authentication documentation was borrowed from the Sidekiq wiki.)
Logging can be especially useful in debugging concurrent systems like Toro. You can modify Toro's logger:
# config/initializers/toro.rb

# Adjust attributes of Toro's logger
Toro.logger.level = Logger::DEBUG

# Or create a custom Logger
Toro.logger = Logger.new(Rails.root.join('log', 'toro.log'))
Toro.logger.level = Logger::DEBUG
See the Logger docs for more.
Copy and set up the database config:
cp spec/config/database.yml.example spec/config/database.ymlToro is tested against Rails 3 and 4, so please run the tests with Appraisal before submitting a PR. Thanks!
appraisal rspec- Toro is robust, quick, and values strength in numbers.
- Toro is durable and runs a little large.
- Toro values visibility.
A good deal of architecture and code was borrowed from @mperham's excellent Sidekiq, so many thanks to him and all of Sidekiq's contributors!
Toro is released under the MIT License. Please see the MIT-LICENSE file for details.