


data-primals-engine is a powerful and flexible Node.js backend framework designed to accelerate development of complex data-driven applications. Built on Express.js and MongoDB, it offers dynamic data modeling, automation workflows, advanced user management, and more.
Whether you're building a CRM, e-commerce site, CMS, or SaaS platform, data-primals-engine provides the strong foundations so you can focus on what makes your application unique.

- Visual Data Modeling: Define and update schemas using a powerful UI Model Creator, or directly with JSON. No migrations required.
- Custom API Endpoints: Create server-side logic and new API endpoints directly from the UI in a secure, sandboxed environment.
- Automation Workflows: Trigger complex actions based on data events (create, update, delete) or schedules (cron).
- Advanced Querying & Aggregation: Go beyond simple filters with a visual Condition Builder, deep relation expansion, complex lookups, and dynamic calculated fields.
- Rich UI Data Views: Ready-to-use React components to display your data, including a powerful and configurable Data Table, a Kanban board, and a Calendar view.
- Integrated Backup & Restore: Secure, encrypted user data backups with rotation policies, supporting both local and AWS S3 storage.
- Automatic Data Auditing: Automatically tracks all changes (create, update, delete) for every record, providing a complete version history for auditing and traceability.
- Event-Driven & Extensible: A core event system allows for deep customization and the easy creation of new modules or plugins.
- Authentication & Authorization: Robust role-based access control (RBAC) and pluggable user providers.
- Built-in File Management: Handle file uploads seamlessly with integrated support for AWS S3 storage.
- 🧠 AI Integration: Natively supports OpenAI, DeepSeek and Google Gemini models via LangChain for content generation, analysis, and more.
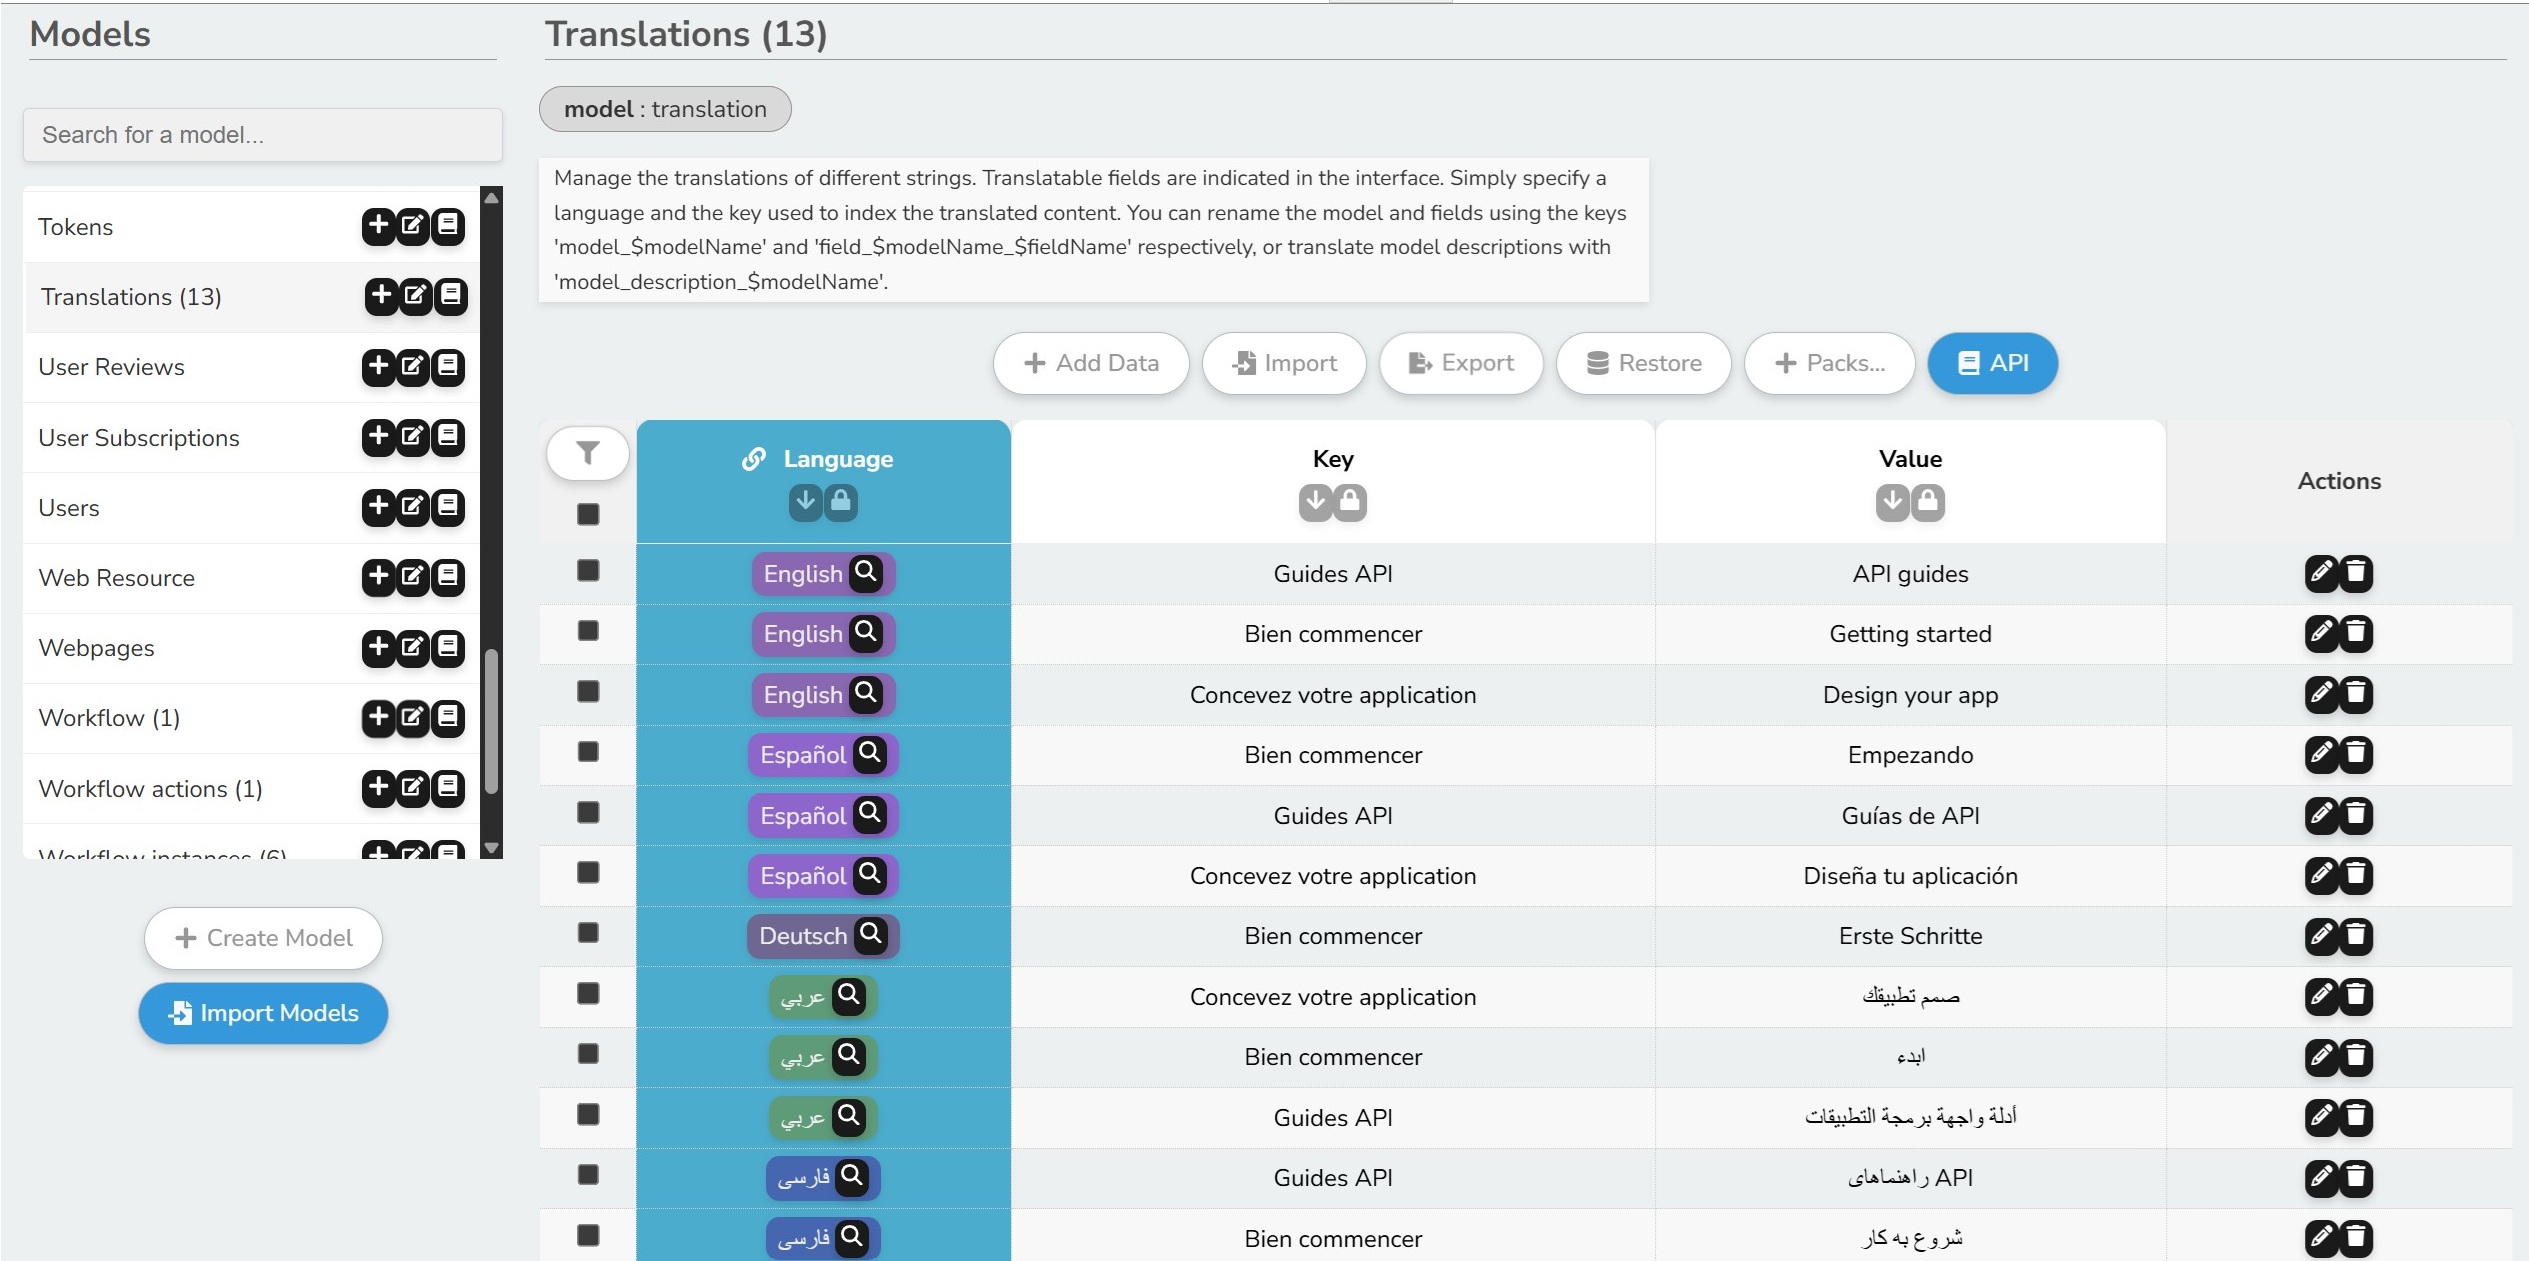
- 🌐 Internationalization (i18n): Fully supports multilingual interfaces and user-specific translated data.
- 📦 Starter Packs: Quickly bootstrap applications with pre-built data packs for CRM, e-commerce, and more.
- 📄Auto-Generated API Documentation: Interactive API documentation available via the interface or at
/api-docs.
- Zero Boilerplate: Focus on your business logic, not infrastructure
- Scalability: Architecture designed for rapidly growing applications
- Modularity: Enable/disable features as needed
- Batteries Included: Everything you need to get started quickly
- Proven Performance: Handles 50k+ documents efficiently
- AI Ready: Built-in LangChain integration for main providers (OpenAI,Gemini,Anthropic,DeepSeek)
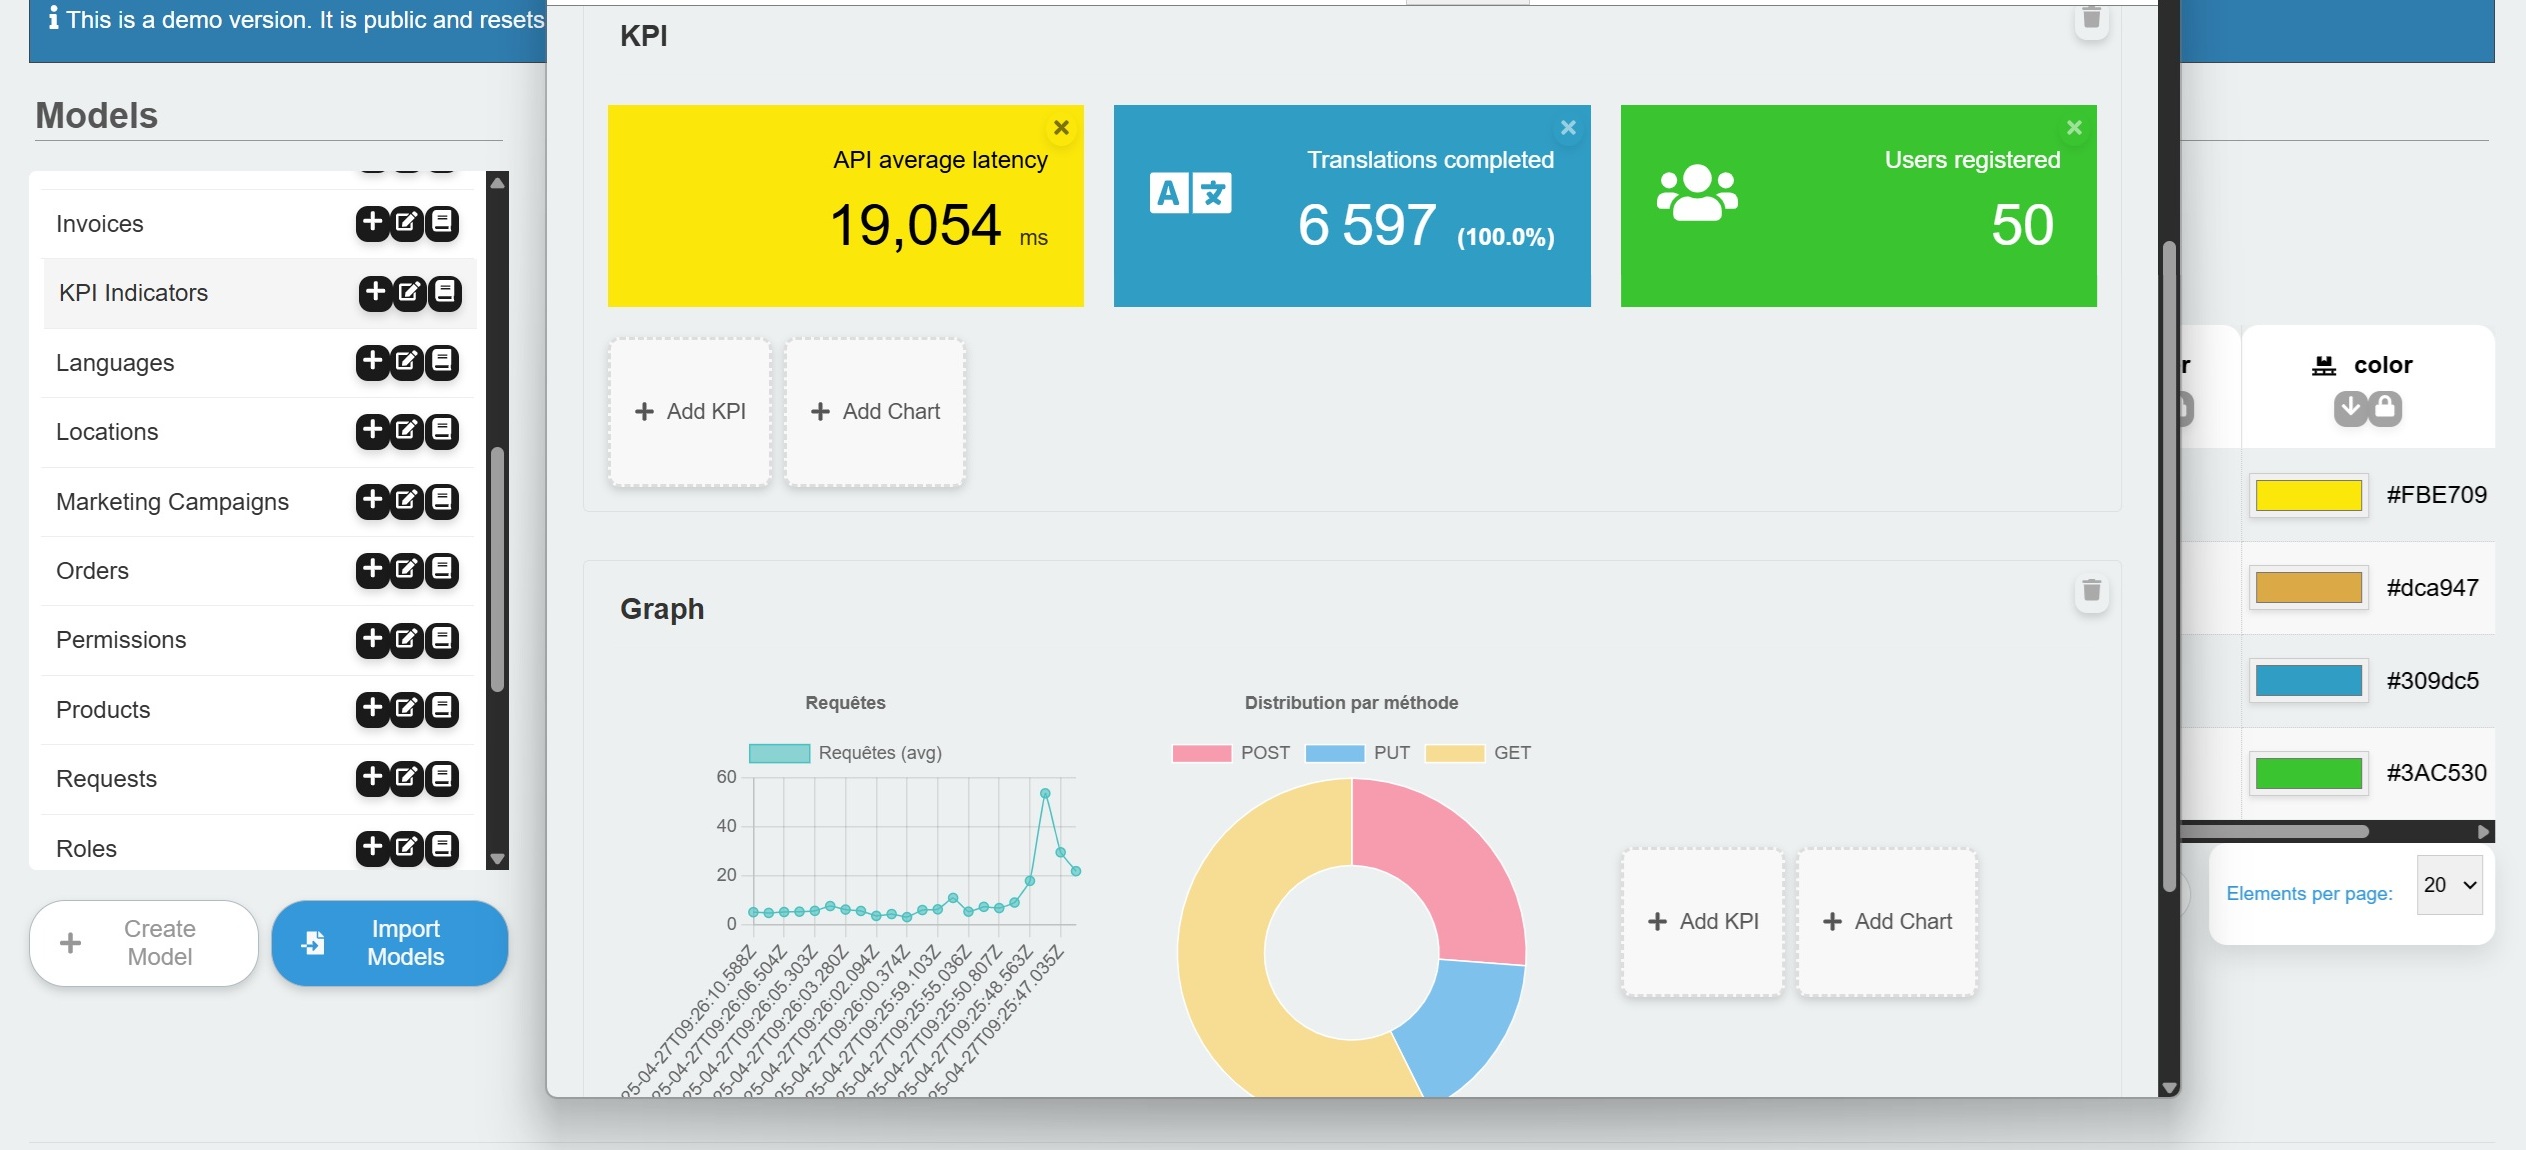
The engine has been rigorously tested to ensure stability and scalability. Load tests simulating complex, multi-step user journeys (including model creation, data import, and API interactions) show excellent results:
- Zero Failures: 100% success rate under sustained concurrent load.
- Excellent Responsiveness: Median response times as low as 15-30ms.
- Linear Scaling: Predictable performance as user load increases.
For detailed reports, see the Performance Testing Documentation.
- Node.js ≥ 20
- MongoDB (local or remote), see installation guide
- NPM or Yarn
# Verify required versions
node -v # Must show ≥ v20
mongod --version # Must be installednpm i data-primals-engineor
git clone https://github.com/anonympins/data-primals-engine.git
cd data-primals-engine
npm installPossibly create a .env file:
MONGO_DB_URL=mongodb://127.0.0.1:27017| Variable | Description | Example |
|---|---|---|
| MONGO_DB_URL | Connection URL for your MongoDB database. | mongodb://user:pass@host:27017/db |
| PORT | Port on which the Express server will listen. | 7633 |
| JWT_SECRET | Secret key for signing JWT authentication tokens. | a_long_random_secret_string |
| OPENAI_API_KEY | Your optional OpenAI API key for AI features. | sk-xxxxxxxxxxxxxxxxxxxx |
| GOOGLE_API_KEY | Your optional Google (Gemini) API key for AI features. | AIzaSyxxxxxxxxxxxxxxxxxxxx |
| DEEPSEEK_API_KEY | Your optional DeepSeek API key for AI features. | sk-xxxxxxxxxxxxxxxxxxxx |
| ANTHROPIC_API_KEY | Your optional Anthropic API key for AI features. | sk-ant-xxxxxxxxxxxxxxxxxxx |
| AWS_ACCESS_KEY_ID | AWS access key for S3 storage (files, backups). Keep empty to disable | AKIAIOSFODNN7EXAMPLE |
| AWS_SECRET_ACCESS_KEY | AWS secret access key. | wJalrXUtnFEMI/K7MDENG/bPxRfiCYEXAMPLEKEY |
| AWS_REGION | Region for your S3 bucket. | eu-west-3 |
| AWS_S3_BUCKET_NAME | Name of the S3 bucket to use. | my-backup-bucket |
| SMTP_HOST | SMTP server host for sending emails. | smtp.example.com |
| SMTP_PORT | SMTP server port. | 587 |
| SMTP_USER | Username for SMTP authentication. | [email protected] |
| SMTP_PASS | Password for SMTP authentication. | password |
| TLS | Encrypted connection (TLS) mode. Disabled by default | 0/1 false/true |
| CA_CERT | Path to CA cert file. | certs/ca.crt |
| CERT | Path to cert file. | certs/cert.pem |
| CERT_KEY | Path to the key file for your certificate. | certs/key.pem |
In addition to environment variables, you can programmatically override most of the application's internal constants at runtime. This is useful for fine-tuning performance, limits, or behavior without restarting the server.
The engine exposes a Config object for this purpose. You can modify any constant defined in src/constants.js.
To override a constant, use the Config.Set() method before initializing the engine:
import express from "express";
import { Engine, Config } from 'data-primals-engine';

// Override default constants before engine initialization
Config.Set("maxRequestData", 1000); // Increase max data per request
Config.Set("maxFileSize", 50 * 1024 * 1024); // Allow larger file uploads (50MB)

const app = express();
const engine = await Engine.Create({ app });# Development mode
npm run devserver
# Production mode
npm run serverBy default, the app runs on port 7633 : http://localhost:7633
The engine includes a pluggable system for user management. For development and testing, it uses a DefaultUserProvider which creates a volatile demo user. This is perfect for getting started quickly without setting up a user database.
For production environments, you should use SSO providers as seen in the page below, or extend the base UserProvider class to connect to your actual user database (e.g., another MongoDB collection, a SQL database, or an external authentication service). This allows you to implement your own logic for finding and creating users.
Models are the way to handle structured data. They organize data and they can be declared in JSON.
{
  "name": "product",
  "description": "E-commerce product schema",
  "fields": [
    { "name": "name", "type": "string", "required": true },
    { "name": "price", "type": "number", "required": true },
    { "name": "stock", "type": "number", "default": 0 },
    { "name": "category", "type": "relation", "relation": "taxonomy",
       "relationFilter": { "$eq": ["$type", "category"] }
    },
    { "name": "tags", "type": "relation", "relation": "taxonomy", "multiple": true,
       "relationFilter": { "$eq": ["$type", "keyword"] }
    }
  ]
}| Type | Description | Properties/Notes |
|---|---|---|
| string | Character string. | minLength, maxLength |
| string_t | International character string ID. | same as string, translated in { key, value } |
| number | Numeric value (integer or float). | min, max |
| boolean | Boolean value (true/false). | – |
| date | Stores a ISO date. | – |
| datetime | Stores an ISO date and time. | – |
| richtext | Rich text field (HTML) for WYSIWYG editors. | |
| richtext_t | International rich text field (HTML) for WYSIWYG editors. | i18n |
| String validated as an email address. | – | |
| password | String that will be automatically hashed. | – |
| enum | Allows selecting a value from a predefined list. | items: ["value1", "value2"] |
| relation | Creates a link to a document in another model. | relation: "target_model_name", multiple: true/false |
| file | For uploading a file (stored on S3 if configured). | allowedTypes:['image/jpeg', 'image/png', 'image/bmp'], maxSize: 1024*1000 |
| image | Specialized file type for images, with preview. | – |
| array | Stores a list of values. | itemsType: 'enum' // any type except relations |
| object | Stores a nested JSON object. – | |
| code | Stores language="*" as string, stores language="json" as arbitrary JSON structure. | language="json" conditionBuilder=true |
| color | Stores an hexadecimal value of an RGB color | '#FF0000' |
| model | Stores a model by name | – |
| modelField | Stores a model field path | – |
- Handles up to 2,000 direct relations by default (can be customized). For larger datasets, use intermediate collections
- Automatic indexing on key fields
- Custom indexing on fields
- Anonymizable fields (encrypted for API users)
{
    "name": "modelName",
    "fields": [
         { "name": "fieldName1", .... },
         { "name": "fieldName2", .... }
    ],
    "constraints": [
        // uniqueness
        { "name": "uniqueConstraint", type: "unique", keys: ["fieldName1", "fieldName2"] }
    ]
}- Install ecommerce-starter pack
- Add products via API/UI
- Customize order workflows
- Create ticket model with [open, pending, resolved] statuses
- Configure notification workflows
- Add custom endpoints or dashboards/kpi for analytics
- Define your model
- Set up workflow: "When new entry → generate AI content"
The "Marketing & Campaigning" starter pack provides a powerful solution for sending large-scale email campaigns without overloading your server.
- Install the Pack: A single command installs the necessary models (
campaign,audience) and a sophisticated workflow. - Dynamic Audiences: Create target audiences with MongoDB filters. For example, select all contacts with the "newsletter" tag or located in a specific country.
- Personalized Content: Use variables like
{recipient.firstName}in the subject and body of your emails for a personal touch. - Automated & Scalable Sending: When you schedule a campaign, a pre-configured workflow takes over:
- It processes your audience in small batches (e.g., 10 recipients at a time).
- It sends emails to each batch and waits before processing the next, ensuring stability.
- It tracks processed recipients to avoid duplicates and allow the campaign to be safely paused and resumed.
- Once all emails are sent, the campaign is automatically marked as "completed".
This use case demonstrates how starter packs and workflows can automate complex, performance-critical business logic right out of the box.
data-primals-engine/
├── src/
│   ├── middlewares/
│   ├── migrations/
│   ├── modules/
│   ├── workers/
│   ├── engine.js // The Express engine that serves the API
│   ├── constants.js // The inner-application constants definitions
│   ├── packs.js // The packs that will be loaded and available with installPack() method
│   ├── defaultModels.js // The default models available at startup.
│   ├── ...
└── server.js
Defines a new data model (schema) in the system. The request body must contain the model's name and an array of field definitions.
curl -X POST http://localhost:7633/api/model?_user=demo \
     -H "Authorization: Bearer demotoken" \
     -H "Content-Type: application/json" \
     -d '{
           "name": "newModel",
           "description": "A test model.",
           "fields": [
             {"name": "title", "type": "string", "required": true},
             {"name": "price", "type": "number"}
           ]
}'Modifies an existing model's structure using its unique ID. This allows you to add, remove, or change fields.
curl -X PUT http://localhost:7633/api/model/60d0fe4f5311236168a109ca?_user=demo \
     -H "Authorization: Bearer demotoken" \
     -H "Content-Type: application/json" \
     -d '{
           "name": "updatedModel",
           "description": "Updated description.",
           "fields": [
             {"name": "title", "type": "string", "required": true},
             {"name": "status", "type": "enum", "items": ["active", "inactive"]}
           ]
}'Permanently deletes a model definition using its name. This action is irreversible.
curl -X DELETE "http://localhost:7633/api/model?_user=demo&name=newModel" \
-H "Authorization: Bearer demotoken"Creates a single new document in the specified model. The
dataobject must conform to the model's schema.
curl -X POST http://localhost:7633/api/data?_user=demo \
     -H "Authorization: Bearer demotoken" \
     -H "Content-Type: application/json" \
     -d '{
           "model": "product",
           "data": {
             "name": "Widget Extraordinaire",
             "price": 99.99,
             "stock": 150,
             "published": true
           }
}'Searches for documents using a MongoDB-style filter. This endpoint is ideal for complex queries, pagination, and sorting.
curl -X POST http://localhost:7633/api/data/search?_user=demo \
     -H "Authorization: Bearer demotoken" \
     -H "Content-Type: application/json" \
     -d '{
           "model": "product",
           "filter": { "$gt" : ["$price", 50] }
}'Updates a single document by its unique ID. The request body contains the fields to be modified.
curl -X PUT http://localhost:7633/api/data/64a31c123ef59d4c8d55aa99?_user=demo \
     -H "Authorization: Bearer demotoken" \
     -H "Content-Type: application/json" \
     -d '{
           "model": "product",
           "data": { "price": 109.99 }
}'Updates multiple documents matching a filter. This is efficient for applying changes to a batch of records, such as restocking all out-of-stock products.
curl -X PUT http://localhost:7633/api/data?_user=demo \
     -H "Authorization: Bearer demotoken" \
     -H "Content-Type: application/json" \
     -d '{
           "model": "product",
           "data": { "stock": 999 }
}'Deletes one or more documents. You can provide an array of
idsto delete specific documents.
curl -X DELETE http://localhost:7633/api/data?_user=demo \
     -H "Authorization: Bearer demotoken" \
     -H "Content-Type: application/json" \
     -d '{
           "ids": ["64a31c123ef59d4c8d55aa99"]
}'Make sure you use the code below to initialize the user :
import express from "express";
import {Engine, insertData, searchData } from 'data-primals-engine';

// Ensure the engine is initialized

const app = express();
const engine = await Engine.Create({ app });
const currentUser = await engine.userProvider.findUserByUsername('demo');
if (!currentUser) {
    throw new Error("Could not retrieve the user. Please check credentials or user provider.");
}
console.log(`Successfully authenticated as ${currentUser.username}`);Inserts one or more documents, intelligently handling nested relationships.
// Uses the `currentUser` object defined above
const newProduct = { name: 'Super Widget', price: 99.99, status: 'available' };
const result = await insertData('product', newProduct, {}, currentUser);

if (result.success) {
    console.log(`Successfully inserted document with ID: ${result.insertedIds[0]}`);
}Updates existing data matching the filter.
Example:
await editData(
    "userProfile",
    { _id: "507f1f77bcf86cd799439011" },
    { bio: "Updated bio text" },
    null, // No files
    currentUser
);
await editData(
"resource",
{ source: "507f1f77bcf86cd799439011" },
{ "file[]": {
"path": "C:/Users/.../test-upload-on-insert.txt",
"name": 'test-upload-on-insert.txt',
"type": 'text/plain',
"size": 1524,
"lastModifiedDate": new Date(),
}}, // No files
currentUser
);Partially updates data (only modifies specified fields).
Example:
await patchData(
    "settings",
    { userId: "507f1f77bcf86cd799439011" },
    { theme: "dark" },
    null,
    currentUser
);Deletes data with cascading relation cleanup.
Examples:
// Delete by IDs
await deleteData("comments", ["61d1f1a9e3f1a9e3f1a9e3f1"], user);

// Delete by filter
await deleteData("logs", { createdAt: { $lt: "2023-01-01" } }, user);Powerful search with relation expansion and filtering.
Query Options:
- model: Model name to search
- filter: MongoDB-style filter
- depth: Relation expansion depth (default: 1)
- limit/page: Pagination
- sort: Sorting criteria
Example:
const results = await searchData({
     model: "blogPost",
     filter: { status: "published" },
     depth: 2, // Expand author and comments
     limit: 10,
     sort: "createdAt:DESC"
}, user);Imports data from Excel / JSON / CSV files.
Supported Formats:
- Excel with headers or field mapping
- CSV with headers or field mapping
- JSON arrays
- JSON with model-keyed objects
Example:
const result = await importData(
    {
        model: "products",
        hasHeaders: true
    },
    {
        file: req.files.myFileField // from multipart body
    },
    currentUser
);Exports data to a structured format.
Example:
await exportData(
    {
        models: ["products", "categories"],
        depth: 1, // Include relations
        lang: "fr" // Localized data
    },
    currentUser
);
// Returns: { success: true, data: { products: [...], categories: [...] } }Creates an encrypted backup of user data.
Features:
- Automatic encryption
- S3 or local storage
- Retention policies by plan (daily/weekly/monthly)
Example:
await dumpUserData(currentUser);
// Backup saved to S3 or ./backups/Restores user data from backup.
Options:
- modelsOnly: Restore only model definitions
Example:
await loadFromDump(currentUser, { modelsOnly: false });
// Full restore including dataInstalls a data pack.
Example:
const result = await installPack([
    {
        "name": "My custom pack",
        "description": "Markdown **description** of the pack",
        "tags": ["customPack", "tag1", "tag2"],
        "models": [
            "env", // default model
            {
                "name": "post",
                "description": "Defines a post",
                "fields": [
                    {"name": "subject", "type": "string", "required": true},
                ]
            }, // or custom
        ],
        "data": {
            "all": { // all languages installed data
                "post": [
                    {"subject": "My pack first data"}
                ]
            },
            "en": { // English specific installed data
                "post": [
                    {"subject": "My english first post"}
                ]
            }
        }
    }
], user, "en");
// Returns installation summary
const result = await installPack("61d1f1a9e3f1a9e3f1a9e3f1", user, "en");
// Returns installation summaryYou can also open the pack gallery to see the JSON structure of each pack, before installing them.
data-primals-engine includes a built-in, automatic auditing system that creates a complete history for every record in your database.
This feature is essential for traceability, debugging, and maintaining a clear audit trail of all data manipulations.
The history feature is non-intrusive and fully automatic.
Whenever you use the standard data management functions (insertData, patchData, deleteData, etc.), the engine performs two actions:
- It executes the requested operation (create, update, or delete) on the target document.
- It saves a complete "snapshot" of the document's state into a dedicated history collection.
Each history entry contains the original data along with crucial metadata:
_op: The type of operation (i for insert, u for update, d for delete)._v: The version number of the record._user: The username of the user who performed the action._updatedAt: The timestamp of the operation._rid: The ID of the original record, linking all history entries together.
You can retrieve the full history for any record via a simple API endpoint:
curl -X GET http://localhost:7633/api/data/history/:modelName/:recordId
Workflows are the automation engine of your application.
They allow you to define complex business processes that run in response to specific events, without writing custom code.
This is perfect for tasks like sending welcome emails, managing order fulfillment, or triggering data synchronization.
A workflow is composed of two main parts: Triggers and Actions.
A 'workflowTrigger' is the event that initiates a workflow run.
- DataAdded: Fires when a new document is created (e.g., a new user signs up).
- DataEdited: Fires when a document is updated (e.g., an order status changes to "shipped").
- DataDeleted: Fires when a document is removed.
- Scheduled: Runs at a specific time or interval using a Cron expression (e.g., 0 0 * * * for a nightly data cleanup job).
- Manual: Triggered on-demand via an API call, allowing you to integrate workflows into any part of your application.
A 'workflowAction' is the individual steps a workflow executes. You can chain them together to create sophisticated logic.
- CreateData: Create a new document in any model.
- UpdateData: Modify one or more existing documents that match a filter.
- SendEmail: Send a transactional email using dynamic data from the trigger.
- HttpRequest: Make an HTTP request (GET, POST, etc.) to an external service or API.
- ExecuteScript: Run a custom JavaScript snippet for complex logic, data transformation, or conditional branching.
- GenerateAIContent: Use an integrated AI provider (like OpenAI or Gemini) to generate text, summarize content, or make decisions.
- Wait: Pause the workflow for a specific duration before continuing to the next step
See the details of the workflow models for more details.
Beyond standard CRUD operations, data-primals-engine allows you to create your own custom API endpoints directly from the UI. This feature acts like a built-in serverless function environment, enabling you to write custom business logic, integrate with third-party services, or create complex data aggregations on the fly.
Your code is executed in a secure, isolated sandbox, with access to the core data functions and the incoming request context.
Define an Endpoint: You create a new document in the endpoint model. Write Your Logic: In the code field, you write the JavaScript that will be executed. Activate: The engine automatically listens for requests on /api/actions/:path that match your endpoint's definition.
To create a custom endpoint, you need to define a document with the following structure:
{
  "name": "GetContactPostCount",
  "path": "postCount/:name",
  "method": "GET",
  "code": "const posts = await db.find('content', { author: { $find: { $eq: ['$lastName', request.params.name]}}}); return { postCount: posts.length };",
  "isActive": true,
  "isPublic": true
}| Field | Type | Description |
|---|---|---|
| name | string | A descriptive name for your endpoint (e.g., "Calculate User Stats"). |
| path | string | The URL path. It can include parameters like :id. |
| method | enum | The HTTP method: GET, POST, PUT, PATCH, or DELETE. |
| code | code | The JavaScript code to execute when the endpoint is called. |
| isActive | boolean | A flag to enable or disable the endpoint without deleting it. |
| isPublic | boolean | A flag to enable public access (private by default). |
Your JavaScript code runs in an async context and has access to several global objects that are securely injected into the sandbox: Your current user is used to make the calls.
This object contains all the information about the incoming HTTP request.
- context.request.body: The parsed request body (for POST, PUT, PATCH).
- context.request.query: The URL query parameters as an object.
- context.request.params: The URL path parameters (e.g., username from /user-summary/:username).
- context.request.headers: The incoming request headers.
A secure API to interact with the database. All methods are async and must be awaited. They automatically operate within the authenticated user's permissions.
- await db.create(modelName, dataObject): Inserts a new document.
- await db.find(modelName, filter): Finds multiple documents. Returns an array.
- await db.findOne(modelName, filter): Finds a single document. Returns an object or null.
- await db.update(modelName, filter, updateObject): Partially updates documents matching the filter (similar to a PATCH).
- await db.delete(modelName, filter): Deletes documents matching the filter.
A safe way to log messages from your script. These logs will be collected and can be returned in the API response if an error occurs, which is very useful for debugging.
- logger.info(...args)
- logger.warn(...args)
- logger.error(...args)
Provides access to the user-defined variables stored in the env model, not the server's process.env.
- await env.get(variableName): Retrieves a single environment variable's value.
- await env.getAll(): Retrieves all user environment variables as an object.
Let's create an endpoint that fetches a user's profile and counts how many posts they have published.
- Create the Endpoint Document Create a new document in the endpoint model with the following data:
{
    "name": "Get User Summary",
    "path": "user-summary/:username",
    "method": "GET",
    "isActive": true,
    "code": "const { username } = context.request.params;\n\n  if (!username) {\n    logger.error('Username parameter is required.');\n    return { success: false, error: 'Username is required.' };\n  }\n\n  logger.info(`Fetching summary for user: ${username}`);\n\n  // Fetch the user profile using the sandboxed db API\n  const userProfile = await db.findOne('userProfile', { username: username });\n\n  if (!userProfile) {\n    return { success: false, error: 'User not found' };\n  }\n\n  // Count the user's published posts\n  const posts = await db.find('post', { \n    authorId: userProfile._id.toString(), \n    status: 'published' \n  });\n\n  return {\n    profile: userProfile,\n    publishedPosts: posts.length\n  };\n});",
}- Call the New Endpoint You can now call this custom endpoint like any other API route:
Expected response :
{
  "profile": {
    "_id": "60d0fe4f5311236168a109ca",
    "username": "demo",
    "bio": "A demo user profile.",
    "...": "..."
  },
  "publishedPosts": 15
}
data-primals-engine features a powerful and modular Single Sign-On (SSO) system built on Passport.js. This allows you to easily integrate with various enterprise and social identity providers. The core engine remains lightweight, and you only enable the providers you need.
The engine provides a central Sso component that manages authentication logic. Each provider (Google, SAML, etc.) is an independent module that "plugs into" this central component.
To enable an SSO provider, follow these three steps:
1. Install the Provider's Library
The required Passport strategy is a peerDependency. You must install it in your project:
npm install passport-google-oauth202. Enable the Module
To enable the module in your next engine initilization, just add it to the modules array:
Config.Set("modules", ["auth-google", "..."]);3. Set Environment Variables
Create or update your .env file with the credentials obtained from the Google Cloud Console:
GOOGLE_CLIENT_ID=your-google-client-id
GOOGLE_CLIENT_SECRET=your-google-client-secret
The login flow will now be available at /api/auth/google.
The process is identical for other supported providers:
-
SAML:
npm install passport-saml-encrypted- Enable the
auth-samlmodule. - Set
SAML_ENTRY_POINT,SAML_ISSUER,SAML_CERT, andSAML_DECRYPTION_KEYenvironment variables.
-
Microsoft Azure AD:
npm install passport-azure-ad- Enable the
auth-microsoftmodule. - Set
MICROSOFT_CLIENT_ID,MICROSOFT_CLIENT_SECRET, andMICROSOFT_TENANT_IDenvironment variables.
This modular approach makes it simple to extend the engine with any Passport-compatible strategy to meet your authentication needs.
See implementations in the modules directory.
You can use the events below to access the engine and manipulate API responses. It is useful for custom modules or middlewares for your application.
Just use
Event.Listen("OnDataAdded", (data) => {
     my_callback()
}, "event", "user");
or the system version
Event.Listen("OnDataAdded", (engine, data) => {
     my_callback()
}, "event", "system");| Event | Description | Scope | Triggered by | Arguments (Payload) |
|---|---|---|---|---|
| OnServerStart | Triggered once the HTTP server is started and listening. | System | engine.start() | engine |
| OnServerStop | Triggered right after the HTTP server is stopped. | System | engine.stop() | engine |
| OnModelsLoaded | Triggered after the initial models are loaded and validated at startup. | System | setupInitialModels() | engine, dbModels |
| OnModelsDeleted | Triggered after all models are deleted via the reset function. | System | engine.resetModels() | engine |
| OnUserDataDumped | Triggered after a user's data has been backed up (dumped). | System | jobDumpUserData() | engine |
| OnDataRestored | Triggered after a user's data has been restored from a backup. | System | loadFromDump() | (none) |
| OnPackInstalled | Triggered after a data pack has been successfully installed. | System | installPack() | pack |
| OnModelEdited | Triggered after a model definition has been modified. | System & User | editModel() | System: engine, newModel (Pipeline*) User: newModel (or the version modified by the system) |
| OnDataAdded | Triggered after new data has been inserted. | System & User | insertData() | System: engine, insertedIds (Pipeline*) User: insertedIds (or the version modified by the system) |
| OnDataDeleted | Triggered just after data is actually deleted. | System & User | deleteData() | System: engine, {model, filter} (Pipeline*) User: {model, filter} |
| OnDataSearched | Triggered after a data search. | System & User | searchData() | System: engine, {data, count} (Pipeline*) User: {data, count} (or the version modified by the system) |
| OnDataExported | Triggered after a data export. | System & User | exportData() | System: engine, exportResults, modelsToExport (Pipeline*) User: exportResults, modelsToExport (or the version modified by the system) |
| OnDataInsert | Triggered just before data insertion. It will use the overrided data. | System | internal | (data) |
| OnDataValidate | Triggered to override validation check. | System | internal | (value, field, data) |
| OnDataFilter | Triggered to override data filtering operation. | System | internal | (filteredValue, field, data) |
| OnEmailTemplate | Triggered to override custom email templates | System | internal | (templateData, lang) |
| OnSystemPrompt | Triggered to override assistant system prompt | User | handleChatRequest | (user) |
| OnChatAction | Triggered when an action is created by the AI | User | handleChatRequest | (action, params, parsedResponse, user) |
If you want to provide your own hooks, you can call :
const result = await Event.Trigger("OnMyCustomEvent", "event", "user", ...args);Results are merged together if multiple events are triggered.
- strings are concatenated
- numbers are added
- booleans are ANDed
- arrays are concatenated
- objects are merged using spread operator
This engine is designed to work seamlessly with its dedicated client library, data-primals-engine/client. This library provides a complete set of React hooks and UI components to build a rich, data-centric user interface on top of the backend.
While this README focuses on the backend engine and its API, you can find detailed instructions on how to integrate the client part in your React application here:
➡️ View the Frontend Integration Guide
Find the issues available for contributions here
- Fork the repo
- Create your feature branch:
git checkout -b feature/your-feature - Launch
npm run devand make your changes with hot-reload on local port - Commit changes:
git commit -m "Add new feature" - Push to your branch:
git push origin feature/your-feature - Open a pull request
Star ⭐ the repo if you find it useful!
Distributed under the MIT License. See LICENSE file.